oneSchedule Overview
onePOS provides an in-house employee scheduling tool that is accessible through oneMetrix.
This allows users to create schedule records, enter employee availability, copy schedule data, view reports, and execute other various scheduling tasks with the convenience of utilizing the familiar interface of onemetrix.com. Once the schedule is created on oneMetrix, it can be downloaded easily in the POS system, allowing users to view Employee Schedule Reports as well as schedule enforcement. The first step in setting up onePOS scheduling is to ensure the data is syncing from the POS to oneMetrix.
If you have already set up the site to have the data synced into the oneMetrix cloud DB, this section may be skipped.
Syncing Management Console data in oneMetrix Is Required
Configure Preferences/Permissions
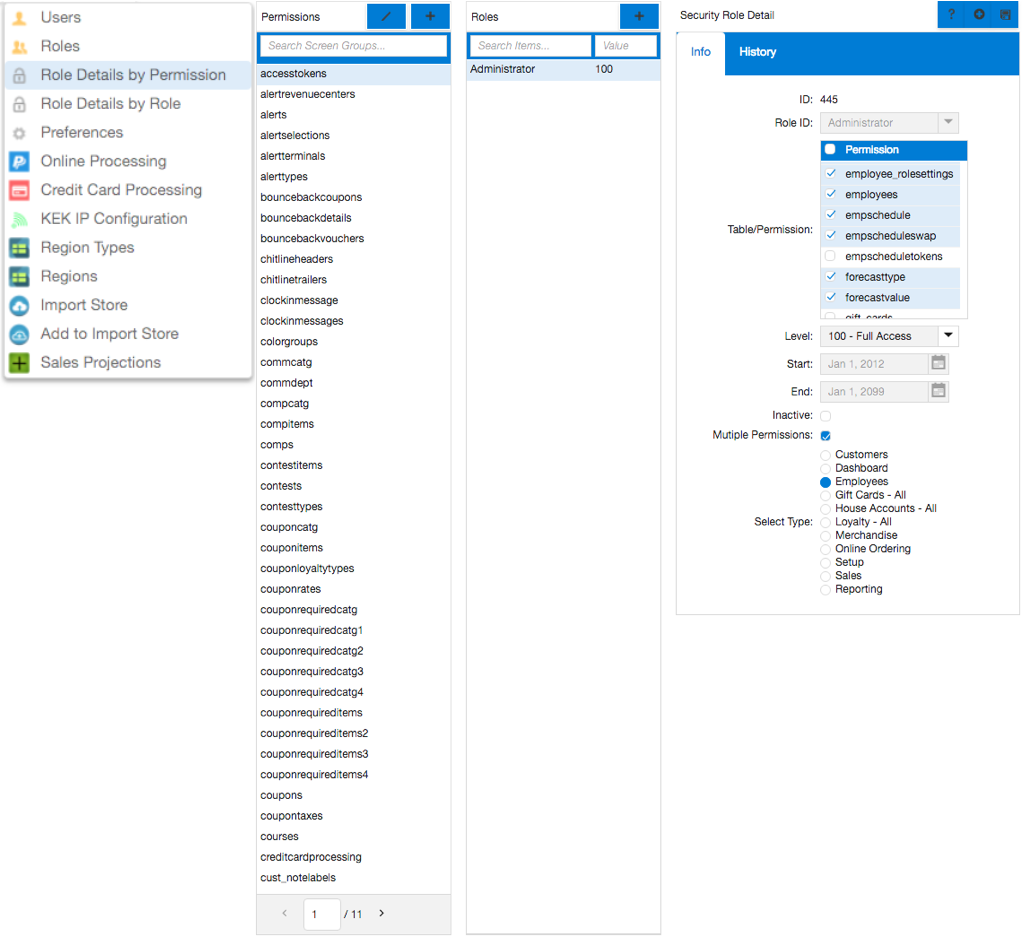
Permissions must be set before scheduling can be used. Go to Role Details by Role or Role Details by Permission under Administrator. Then click the plus button to add/edit multiple permissions. Select Administrator for the Role ID and 100 for the Level. Then check Multiple Permissions to retrieve and then select the Employee permissions. If restricting specific employee permissions unrelated to scheduling is desired, simply uncheck the permissions to exclude them from the bulk add operation.
Also, you must activate the permission for "preferences" to be able to utilize the preferences specified in next step. Click Save to perform the bulk add, saving the permissions.
Configure the onePOS scheduling preferences.
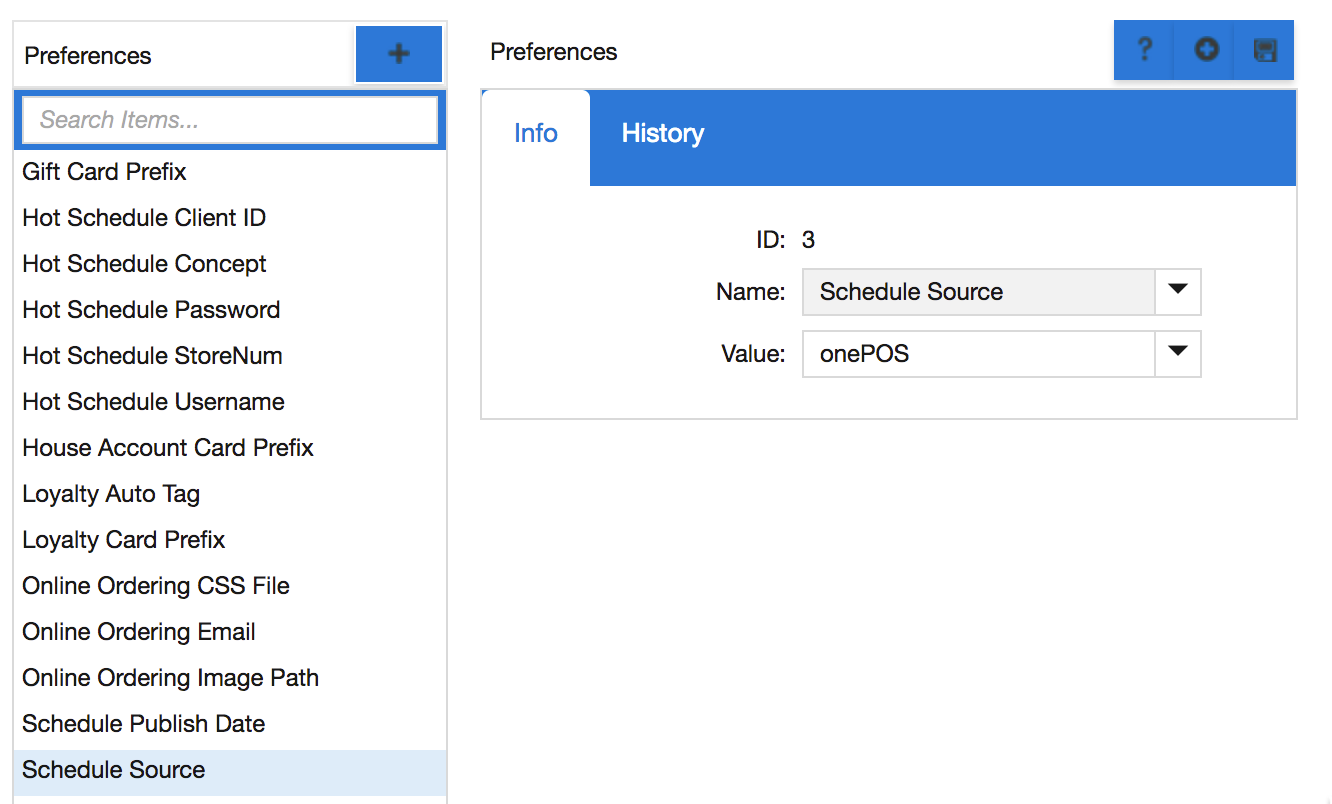
Schedule Source is the initial preference value to set. Go to
Admin->Preferences. Select Schedule Source, and set this value to
onePOS. Then hit the Save button. The site is now configured for onePOS
Scheduling.
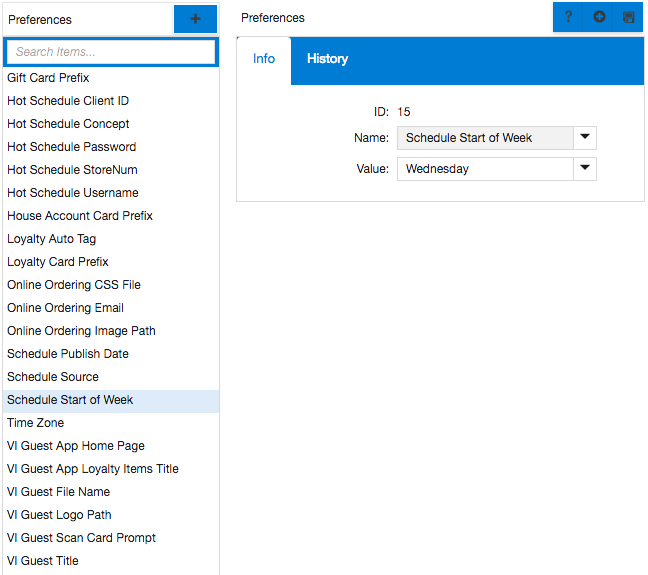
There is one more preference that can be configured on oneMetrix for onePOS Scheduling: Schedule Start of Week. This indicates the day of the week on which the schedule starts and appears in onemetrix. By default (or if it is not set), this value is Sunday.
Creating the Schedule
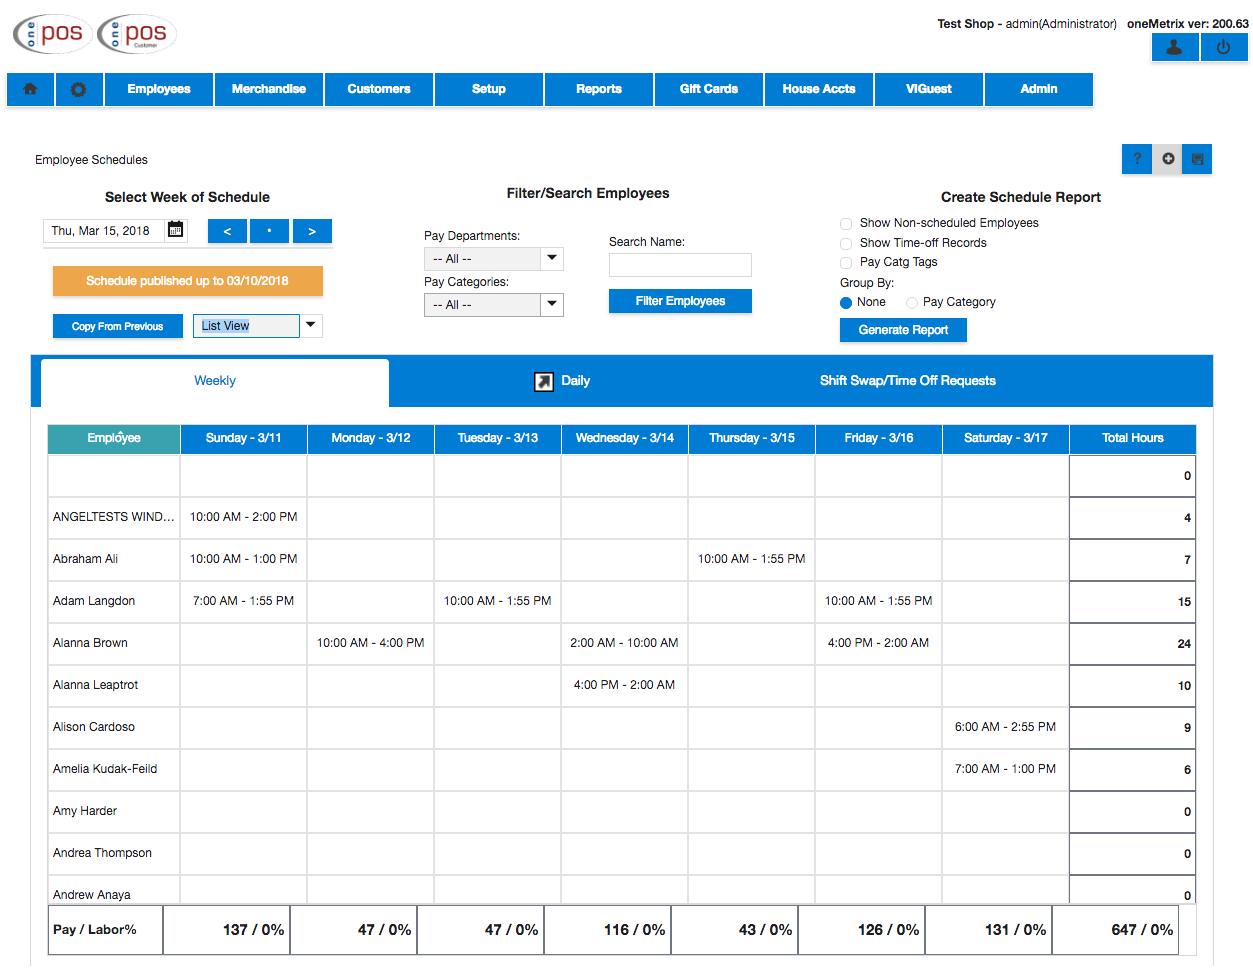
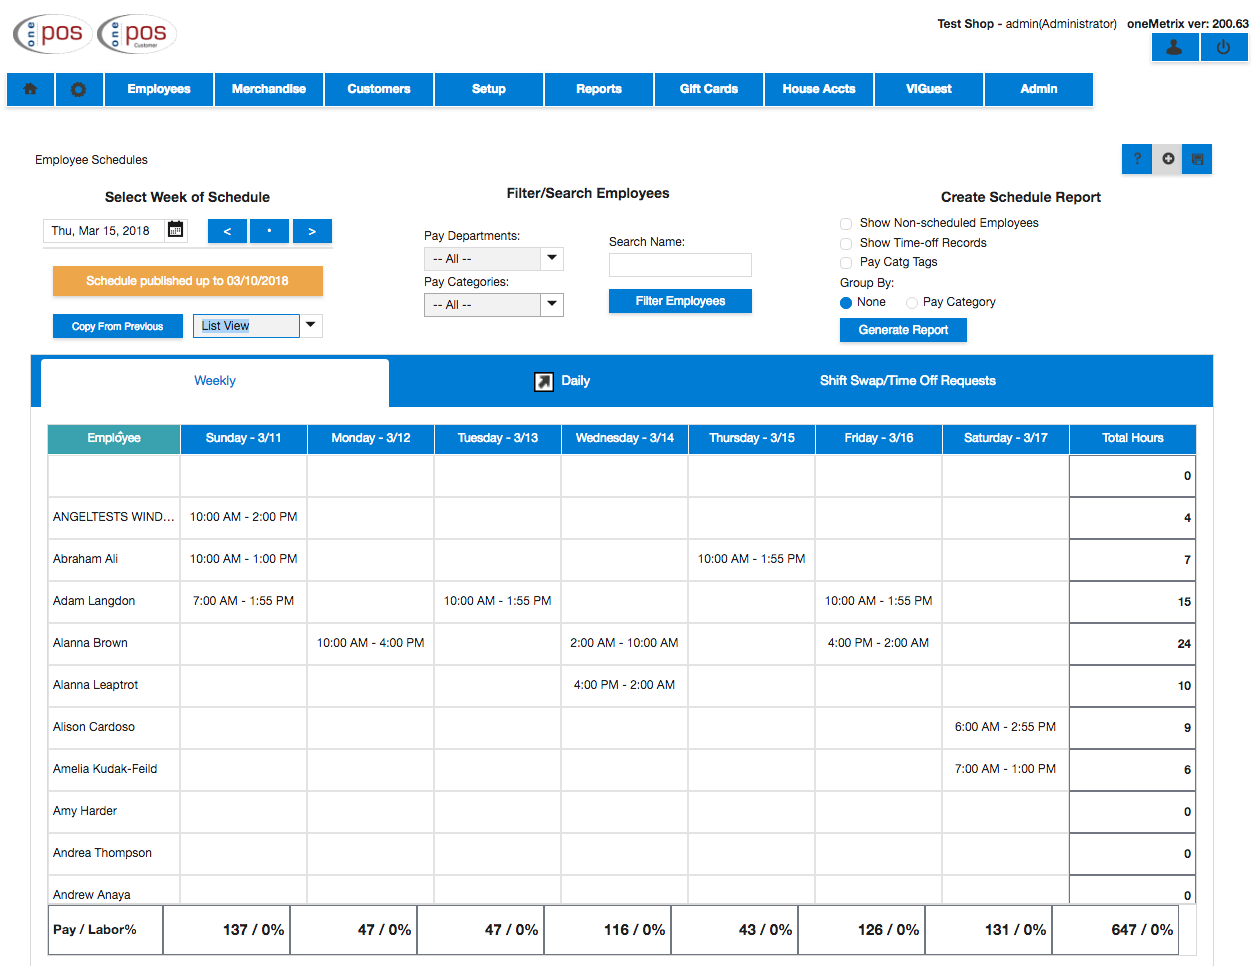
The employee schedule can be created and accessed by navigating to the section: Employees->Employee Schedule in oneMetrix.
Weekly View
Adding/Editing Records
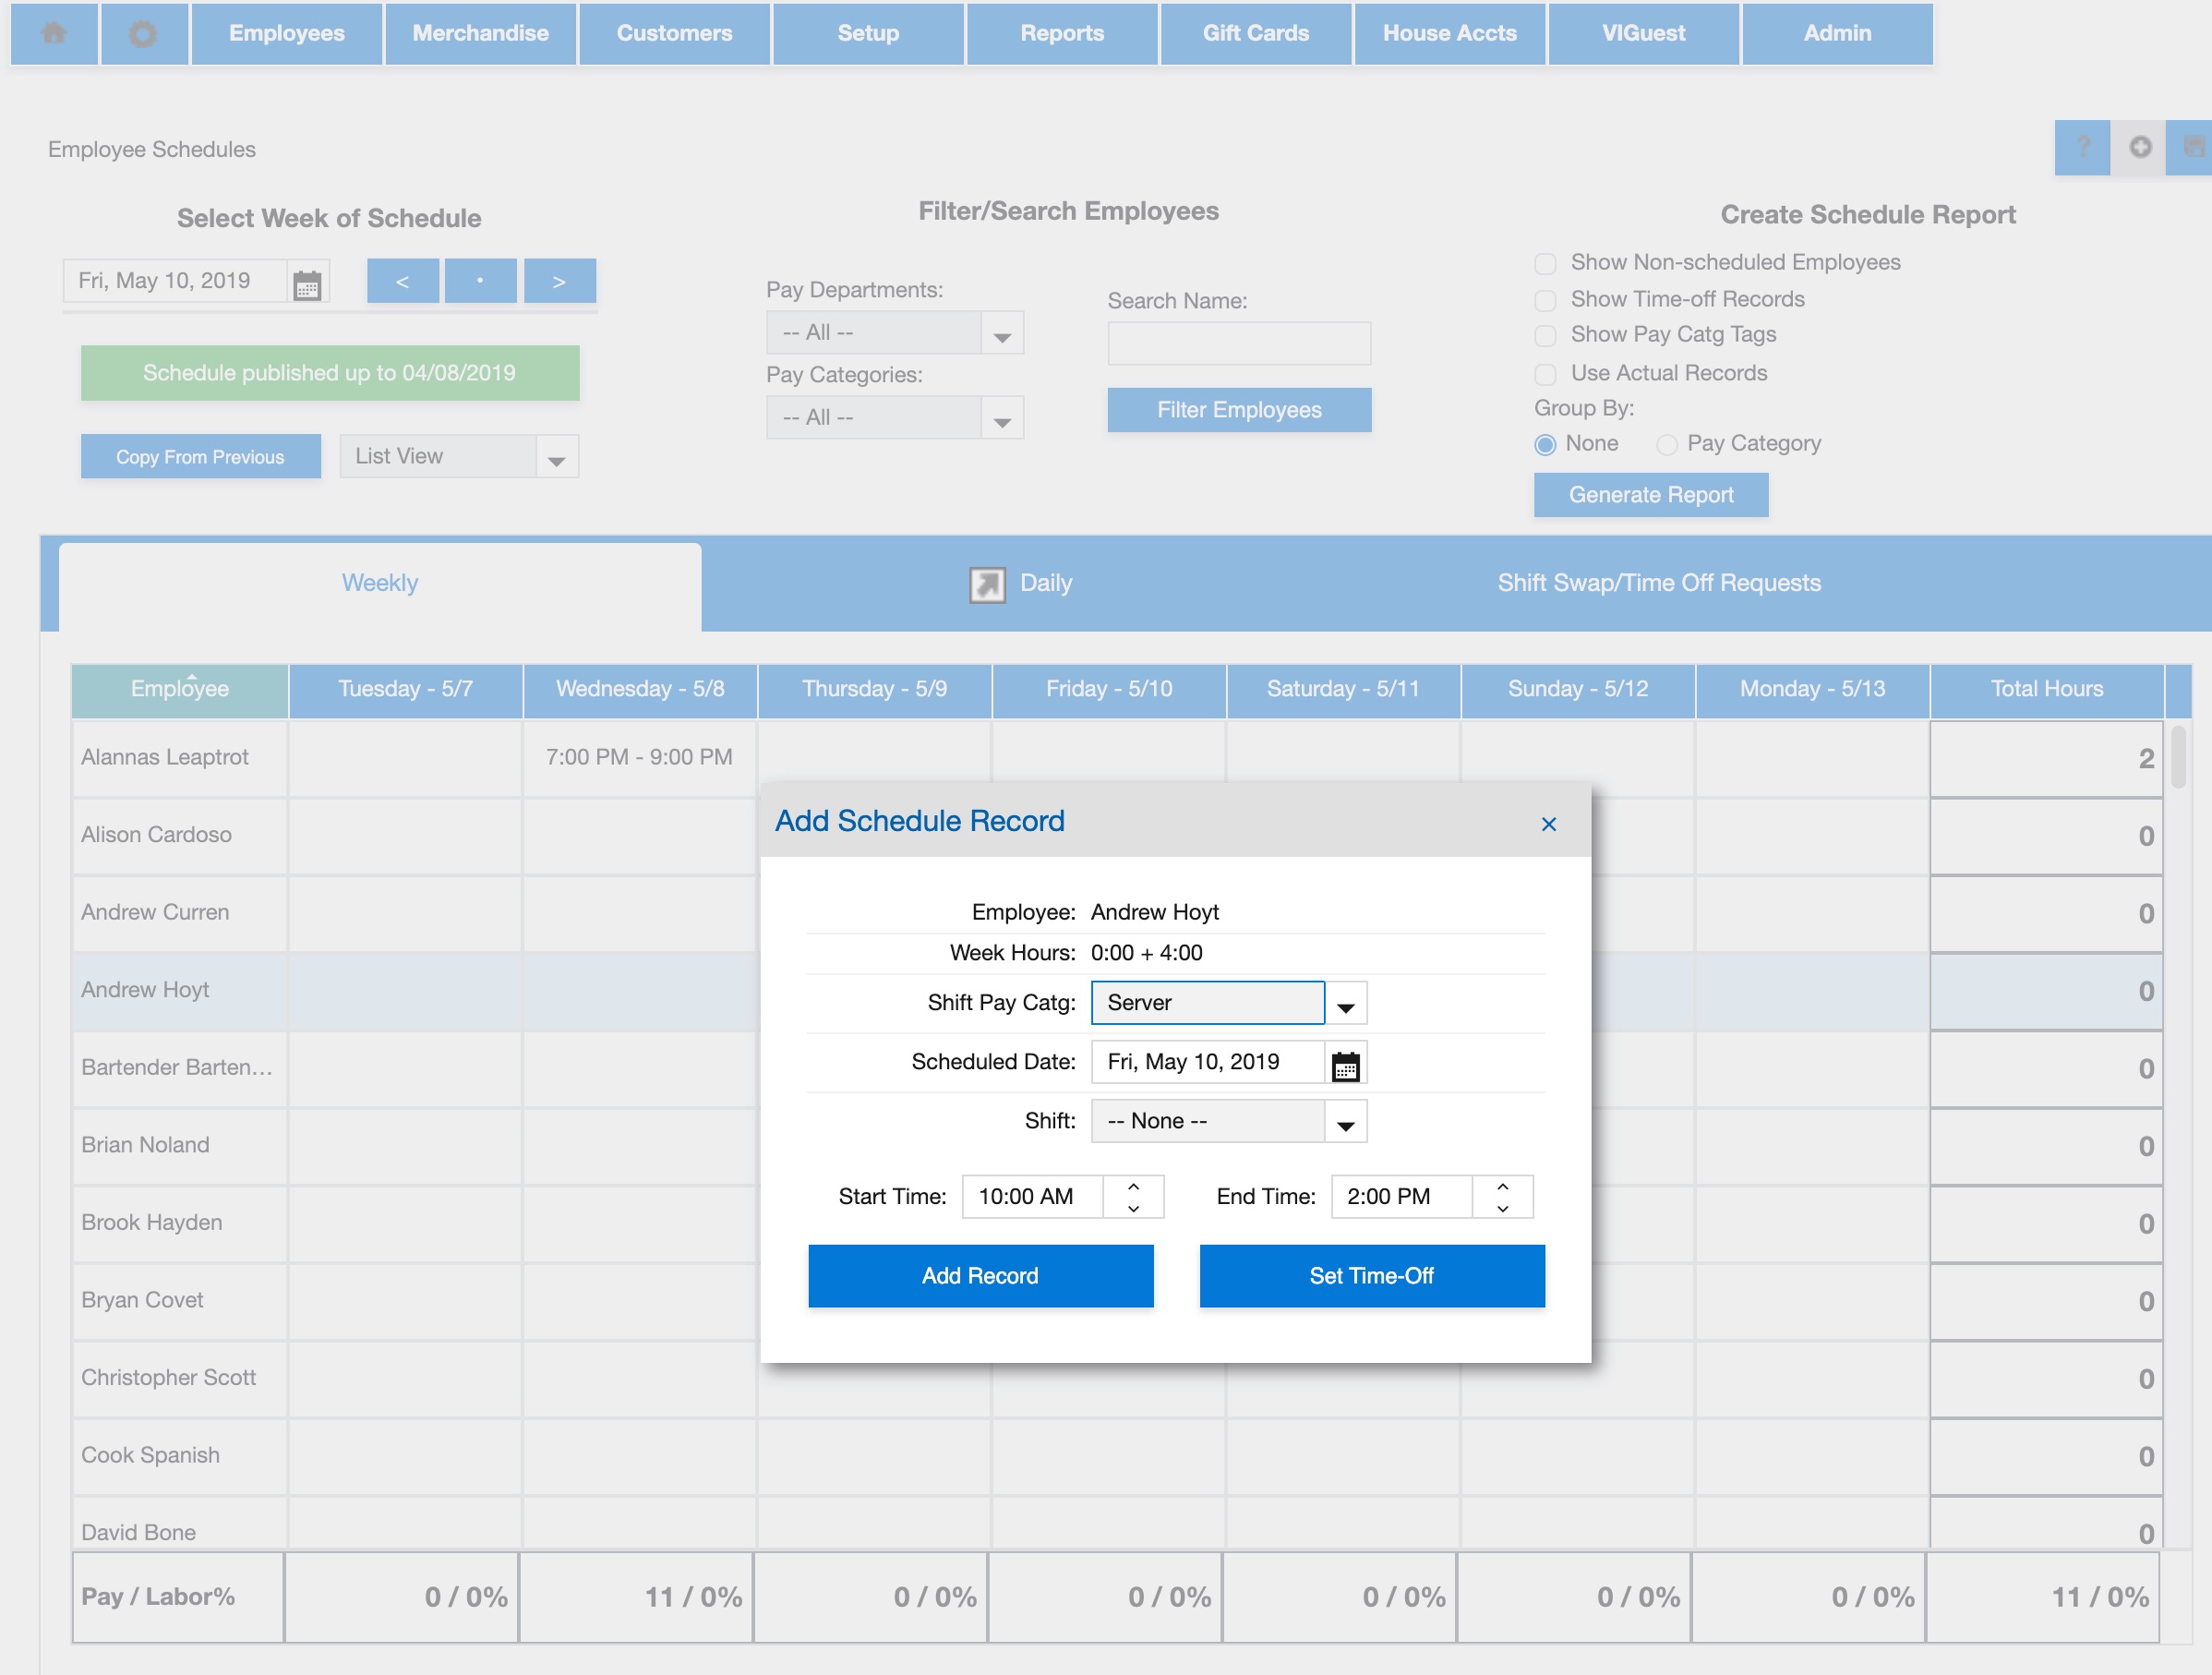
The weekly schedule view provides users with the ability to quickly add
multiple schedule records for multiple employees throughout the
currently loaded week. When initiated, the current week is loaded into
the panel to display the most recent schedule. To add records, click the
cell corresponding to the day/employee for which to add a record. Set
the start and end time, the pay category, and then click Add Record to
create a new schedule record. There are also the capabilities to view
the hours the employee is scheduled for the week, change the date of the
current record, and select the shift. onePOS scheduling supports
storing shift data in 5 minute increments.
Employee Availability
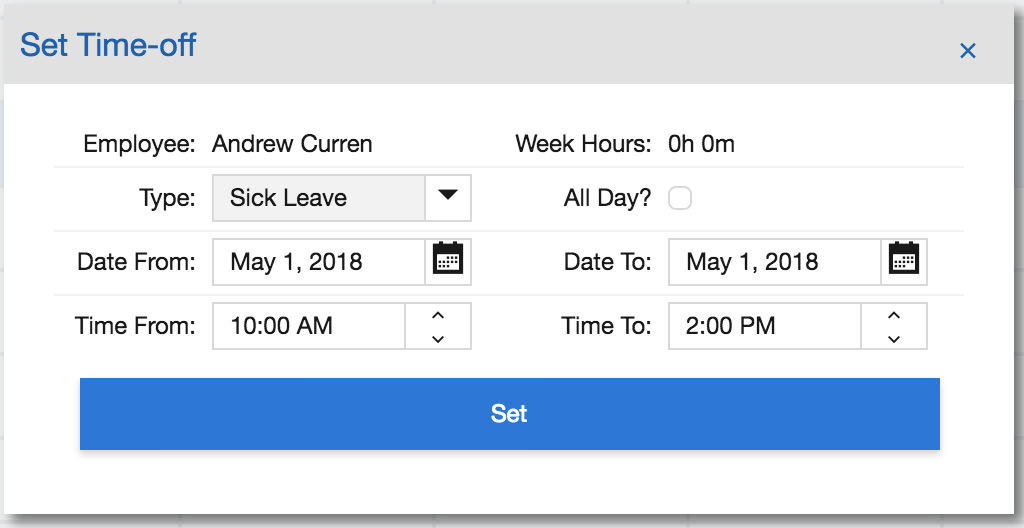
If the employee is not available to work this day, click Set Time Off to
set the availability for the employee. Using the Set Time-Off
interface, select a date or date range to indicate that the employee is
not available to be scheduled. Simply select the type of leave, indicate
if the entire day is applicable, a date from and to (if different than
the current day), and a time from and to (if not the entire day). Click
Set to specify that the employee is unavailable to work during the range
specified.
Select Week of Schedule
The Select Week of Schedule section located at the top left of the panel
provides ways to configure the current view of the data. The employee
schedule view can be toggled by selecting either the List View (to
scroll through the records) or Page View (to page through the records).
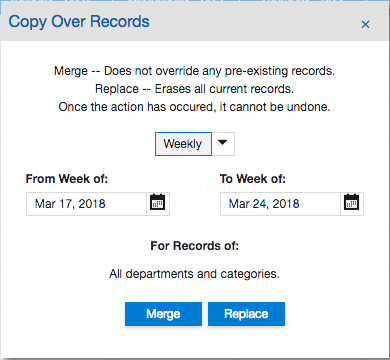
There is also a utility to copy all schedule records from one week into
another, so users may replicate weekly schedules easily. Click Copy from
Prev. to initiate the utility. Then select the From Week of, and the To
Week of properties to specify which weeks to copy. Click Merge (to not
override existing records) or replace (to overwrite any existing
records) to copy the From Week of option to the To Week of option
selected.
Filter/Search Employees
Filtering employees is accomplished through the top middle section of
the panel. Pay Department, Pay Category, and Name are filtering options
provided by the tool. Once filter criteria is entered, click Filter
Employees to view the filtered employee list.
Create Schedule Report
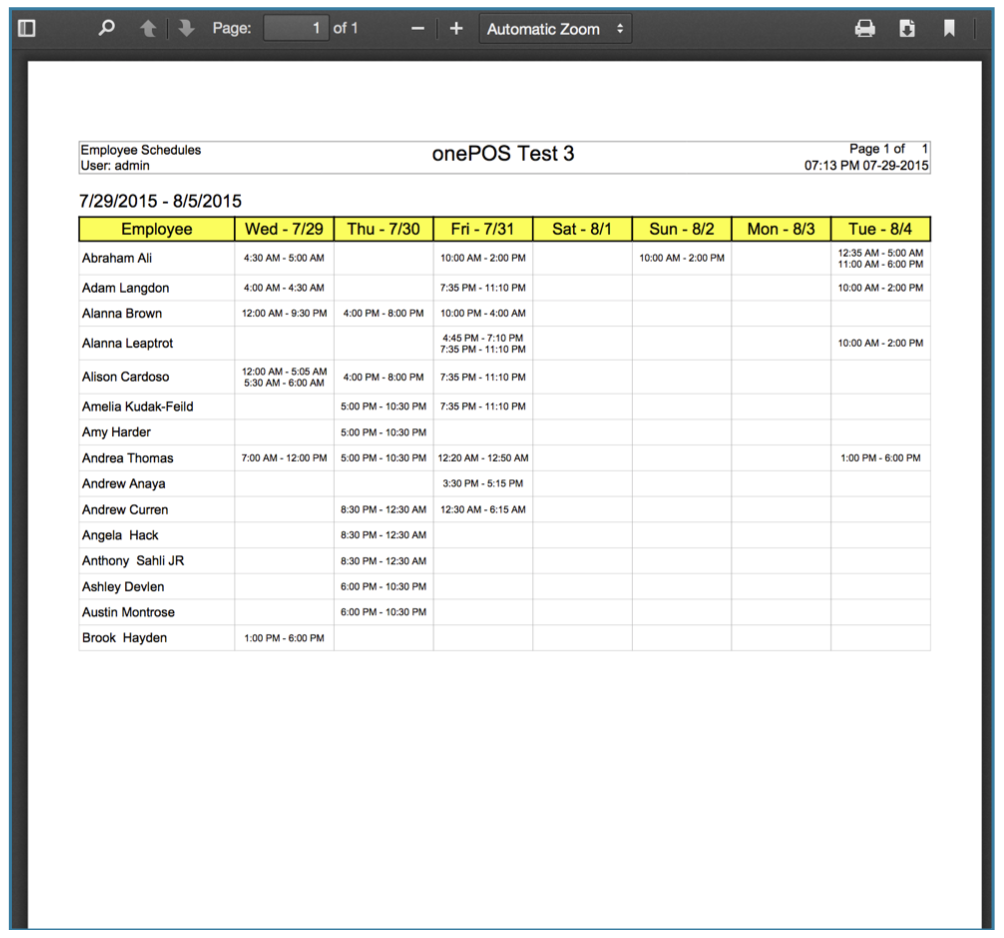
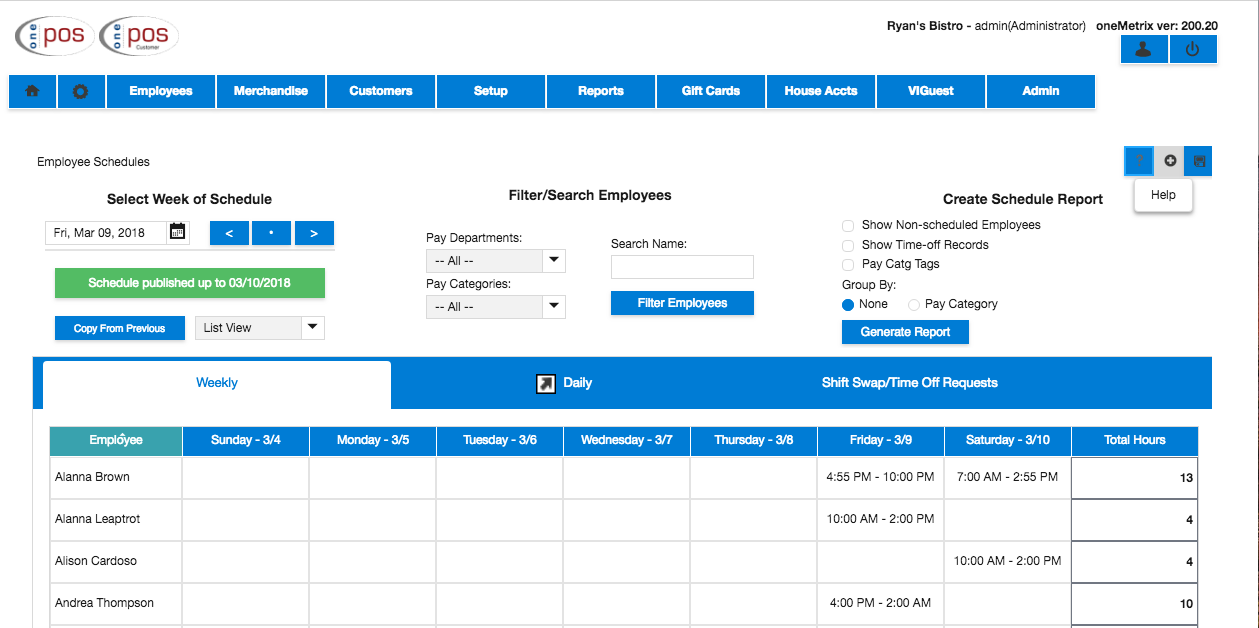
Create a schedule report for the schedule currently loaded into the
employee schedule view. There are three options to toggle prior to
generating this report: showing the non-scheduled employees, showing the
time-off records indicating availability, and showing the pay category
tags for the employees. Users can also group the report data by pay
category by selecting Pay Category in the Group By section. Click
Generate Report to pop out a new window containing a PDF of the report.
Below is an example of a onemetrix Employee Schedule report:
You can also sort the records by day of the week. The earliest records will appear towards the top of the list. This also carries over to generating reports; therefore, when records are sorted by day of the week, the report shows the sorted records as well.
Publish Schedule
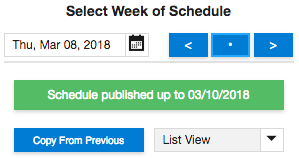
Control the date up to which an employee can see their schedule using the publish schedule button. The button is highlighted by either a green (current week can be viewed by the employees) or orange (the week has not yet been published) background color. Also listed inside the button is the precise date up to which the schedules are posted. A push notification is sent to all employees using the oneSchedule mobile app when the schedule date is changed.
Schedules are posted on a week-to-week basis so users may not select a specific date that the employees will see. Make sure all employees are scheduled properly and select the button, so the button changes from orange to green and subsequently updates the date inside the button to the final day of the current week.
To unpublish a schededule, simply navigate to the point in time where you want the schedule published up to and click the publish button.
*Note: The current calendar week is always published. Make sure all scheduled employees are correct for the current week or else the employees will be able to see the times for which they are scheduled.
Daily View
Overview/Filtering
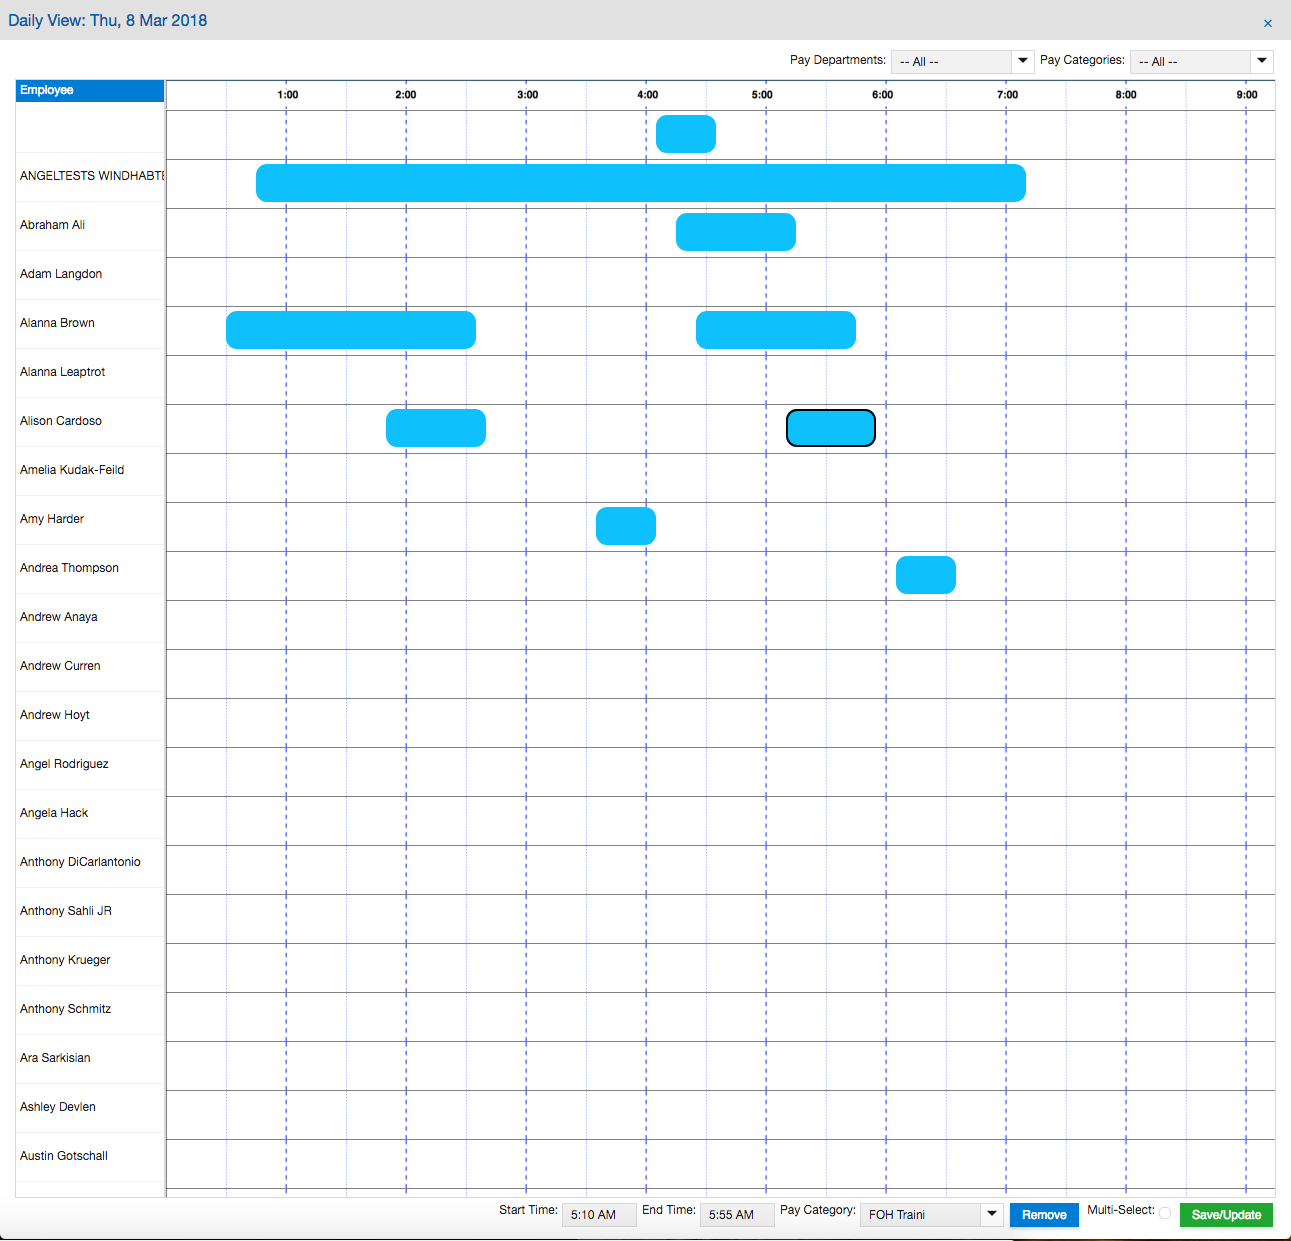
The scheduling interface also provides a Daily View for modifying
schedule data. This allows users to manipulate, copy, add and remove
daily schedule records in an innovative way. Click the Daily tab located
just above to pop out the daily view. The schedule for the current day
is then popped out into a large panel. Filtering employees by pay
department and pay category in the daily view is accomplished by
selecting the applicable department/category in the drop downs located
in the top right section of the view. The shifts appear as blue cells on
the grid. The image below shows an example of what the daily view for a
schedule way look like.
Adding/Editing Records
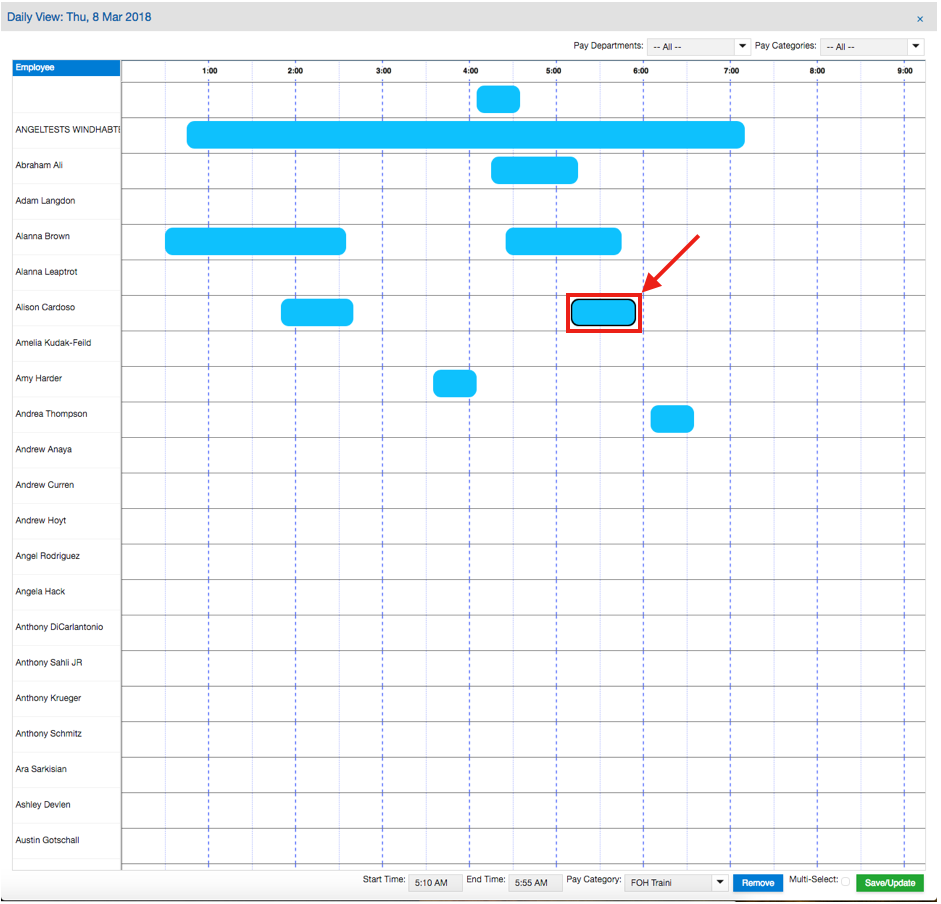
To add/edit a new record in the daily view, first locate the employee in
the list. To add, double- click the grid where the shift will begin for
the employee, or to edit an existing record simply click on the shift
to edit. If added, a new blue cell is added to the grid showing the
record to be added. If selected for editing, the shift appears
highlighted in black. To move the start/end time of the shift, go to the
appropriate edge of the newly-created blue cell and drag the cell to
the desired time. Users can track the start and end times in the
respective text fields at the bottom of the tool.
Users may also drag the entire shift for the employee to the right or left depending on where the shift needs to be placed. Users can also select the pay category for the shift using the Pay Category drop down at the bottom of the screen. If a record needs to be deleted, select the shift, and click Remove.
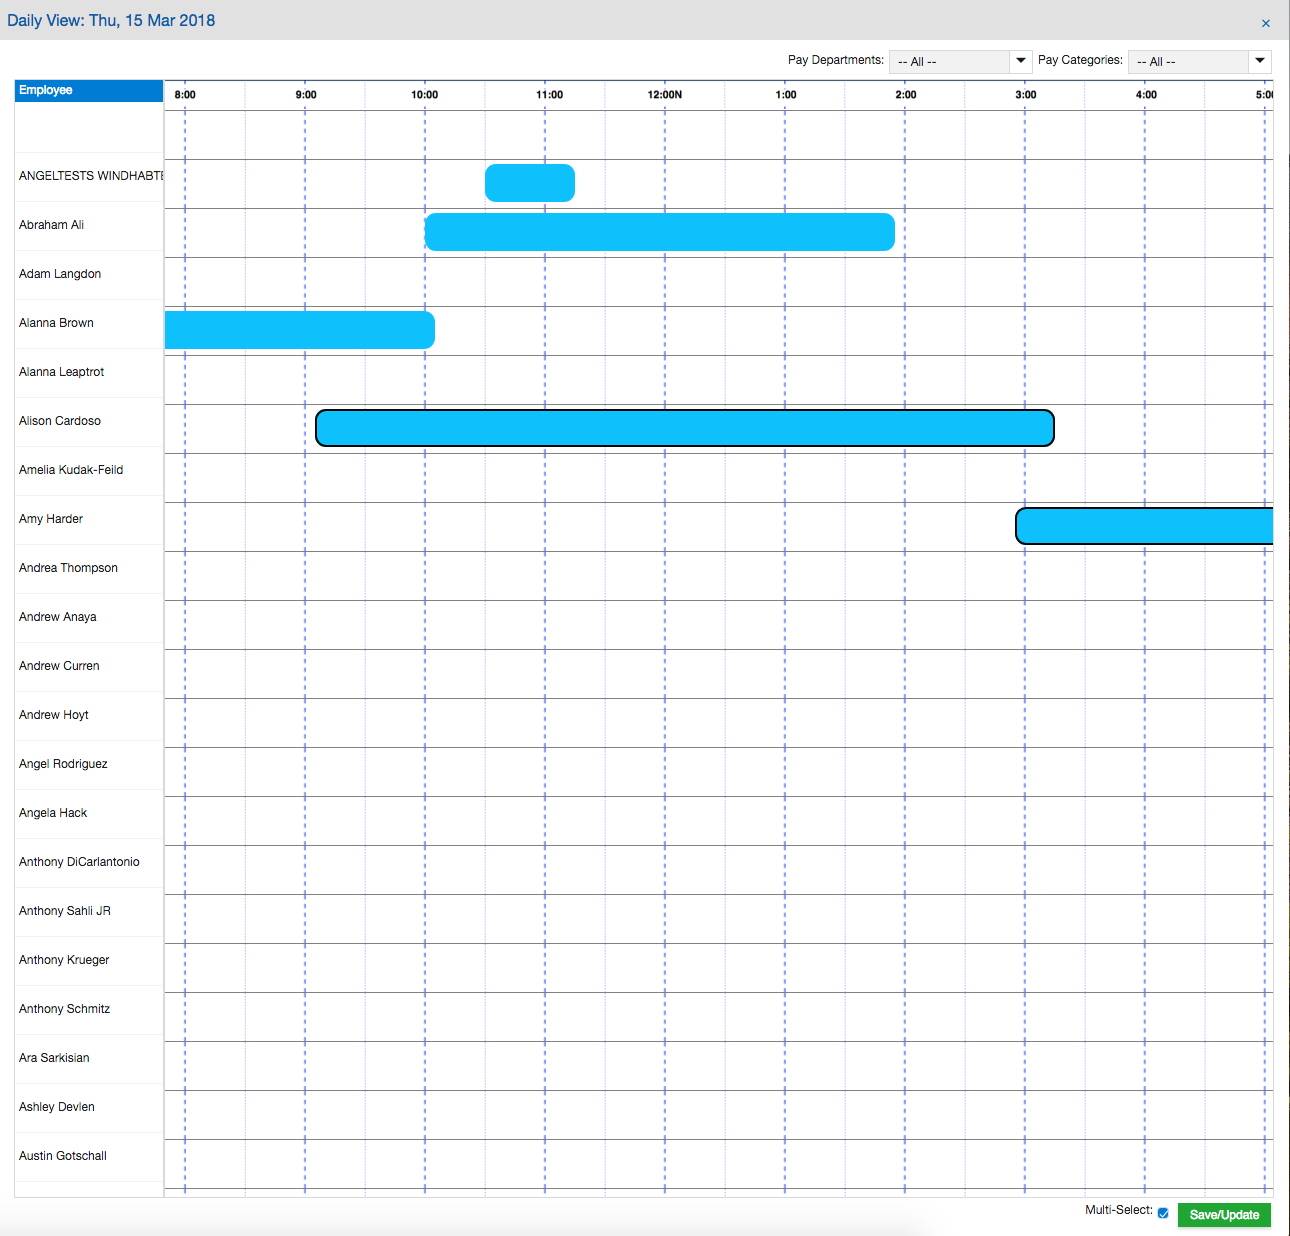
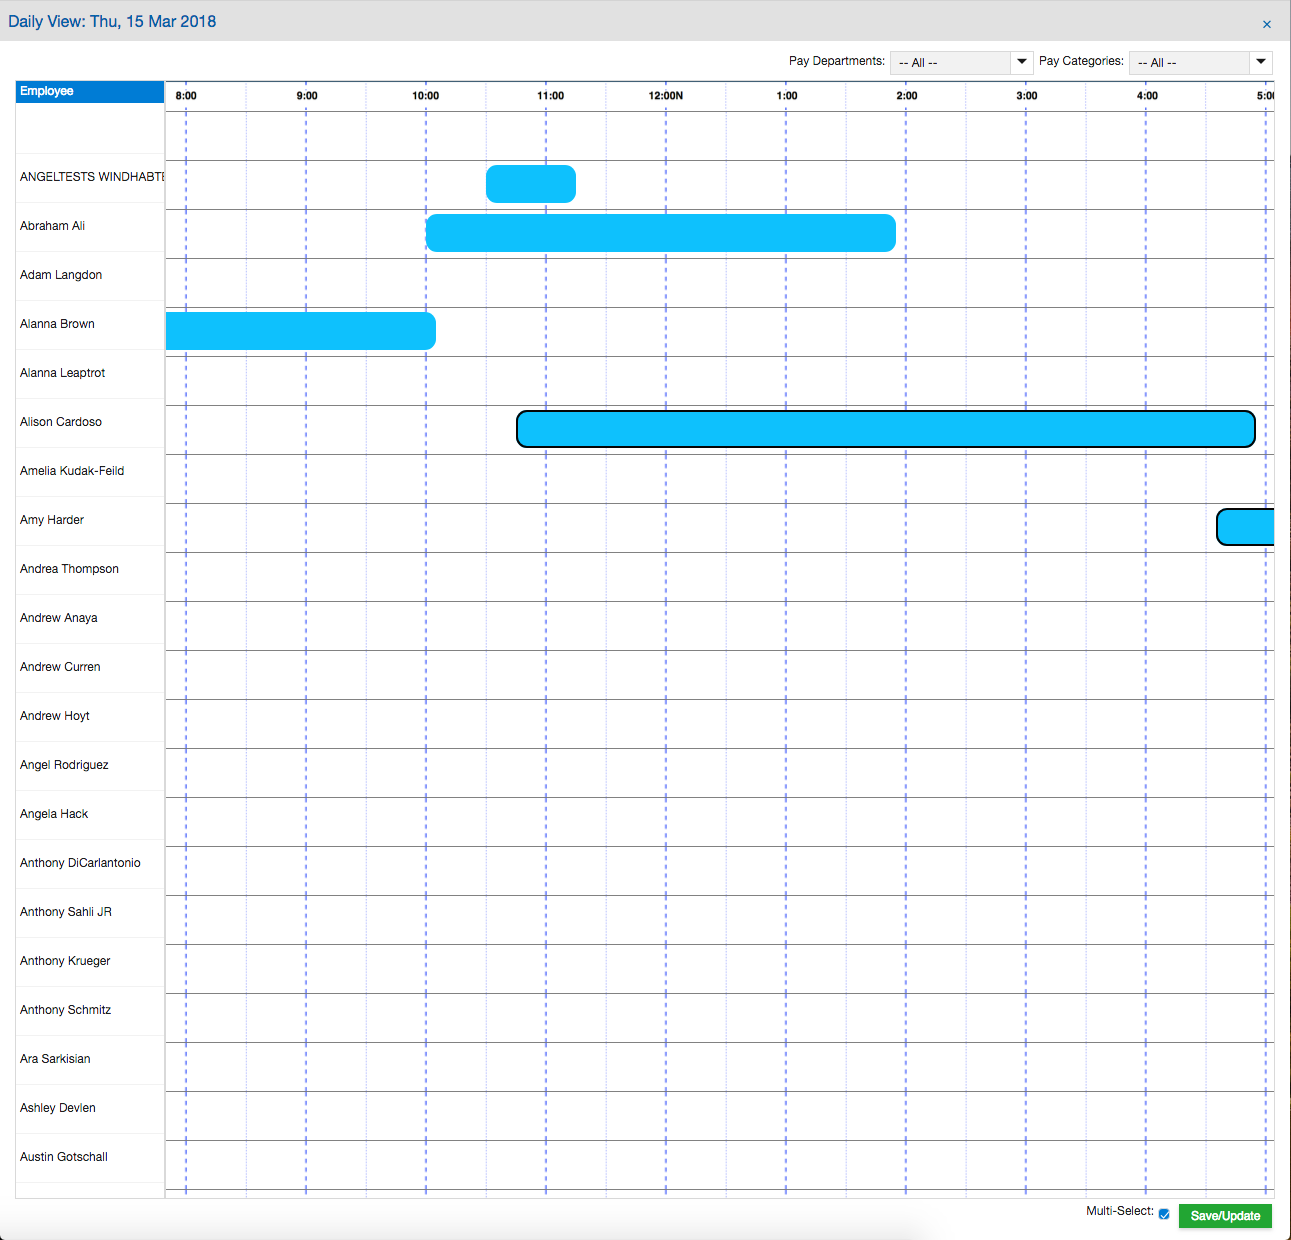
Click Save/Update to save the data on the screen. If you do not click Save/Update, the records will not be added to the schedule. In the example below, take note that a new record was added, stretched to a longer duration, and placed in a new time slot.
Multi-Select Mode
The Daily View also allows users to select multiple shifts, and move
them to a new location on the grid. Check the Multi-Select box to enable
this mode. Then click on multiple schedule records to move them to new
locations on the grid. If users try to drag records on top of existing
records, the grid changes colors to show that there is a scheduling
conflict. Note that saving is not allowable if there are conflicts, and
the Save/Update button turns red. See in the example below that two
records were selected, dragged to a valid earlier time, then dragged to
an invalid earlier time. Note how conflicted schedule data appears on
the view.
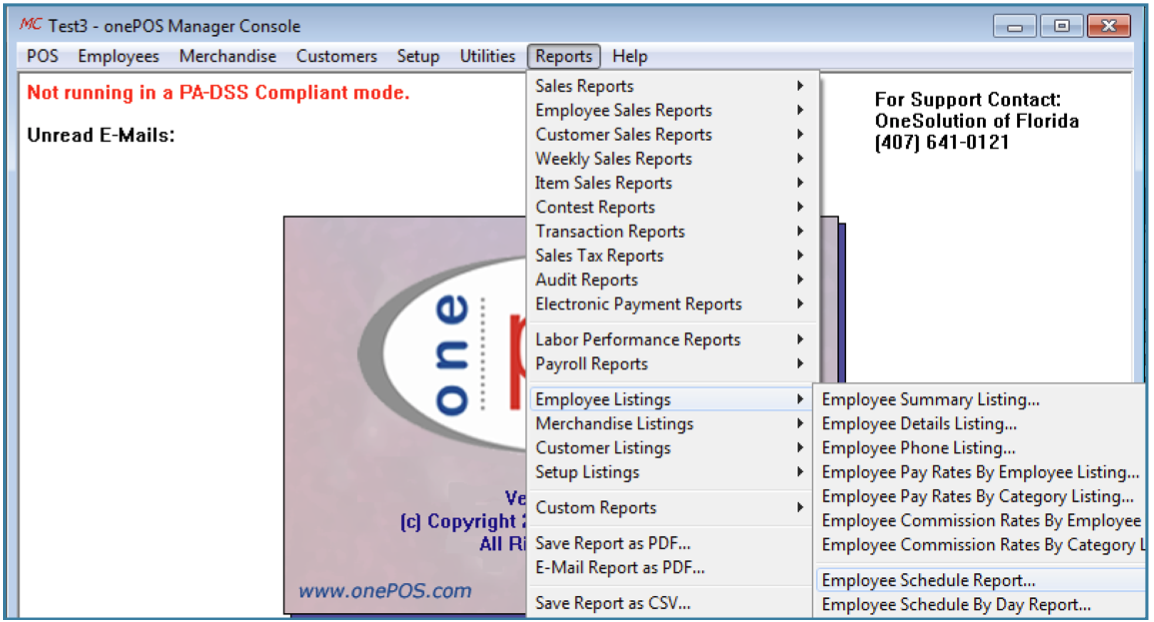
Then, view these schedule records by selecting reports->Employee Listings->Employee Schedule Report in Management Console.
Shift Swap/Time Off Requests
The Shift Swap/Time Off Requests functionality allows employees to submit requests regarding alterations to their work schedule which managers can approve or decline. Shift swap and time off requests are submitted by employees using the 'oneSchedule' mobile app that is downloadable from the Google Play Store or Apple App Store.
Shift Swaps
With shift swaps, employees can offer their shift for other employees to
grab. This allows for Employee A's shift to be transferred to Employee
B. In the screenshot below, Alanna Brown is trying to give away a Server
shift. Currently, no one has elected to take her shift, and thus the
recipient is shown as two dashes ("--"). At this stage, the manager can
choose to shut down the shift swap request by clicking the "Decline"
button.

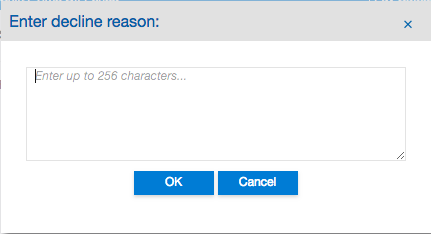
If the Decline button is clicked, a window will pop up, allowing the manager to enter a reason for declining the employee's shift swap request. The employee will be able to read this message in the oneSchedule mobile app.
In this screenshot we can see that Andrew Curren has chosen to request to take on Alanna's shift. By clicking the "Approve" button, the shift will transfer from Alanna's schedule to Andrew's.

Time Off Requests
Employees can submit time off requests from the oneSchedule mobile apps.
In the screenshot below, Alanna has sent in a time off request as noted
by the "Time Off" icon to the left of her name. By clicking "Approve" a
time off record will be added to Alanna's schedule and her manager will
be unable to schedule her for shifts that conflict with her time off
period.

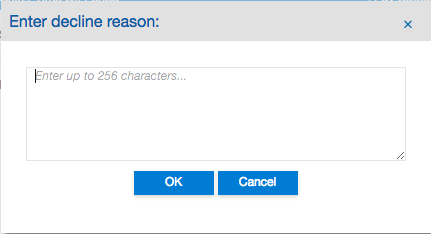
If the Decline button is clicked, a window will pop up, allowing the manager to enter a reason for declining the employee's time off request. The employee will be able to read this message in the oneSchedule mobile app.
NOTE: If a manager wants to undo a decision made in the Shift Swap/Time Off Requests tab, he or she will have to go to the Weekly or Daily view and delete/re-create the shifts for the affected employees.
Projected Sales/Labor Ratio
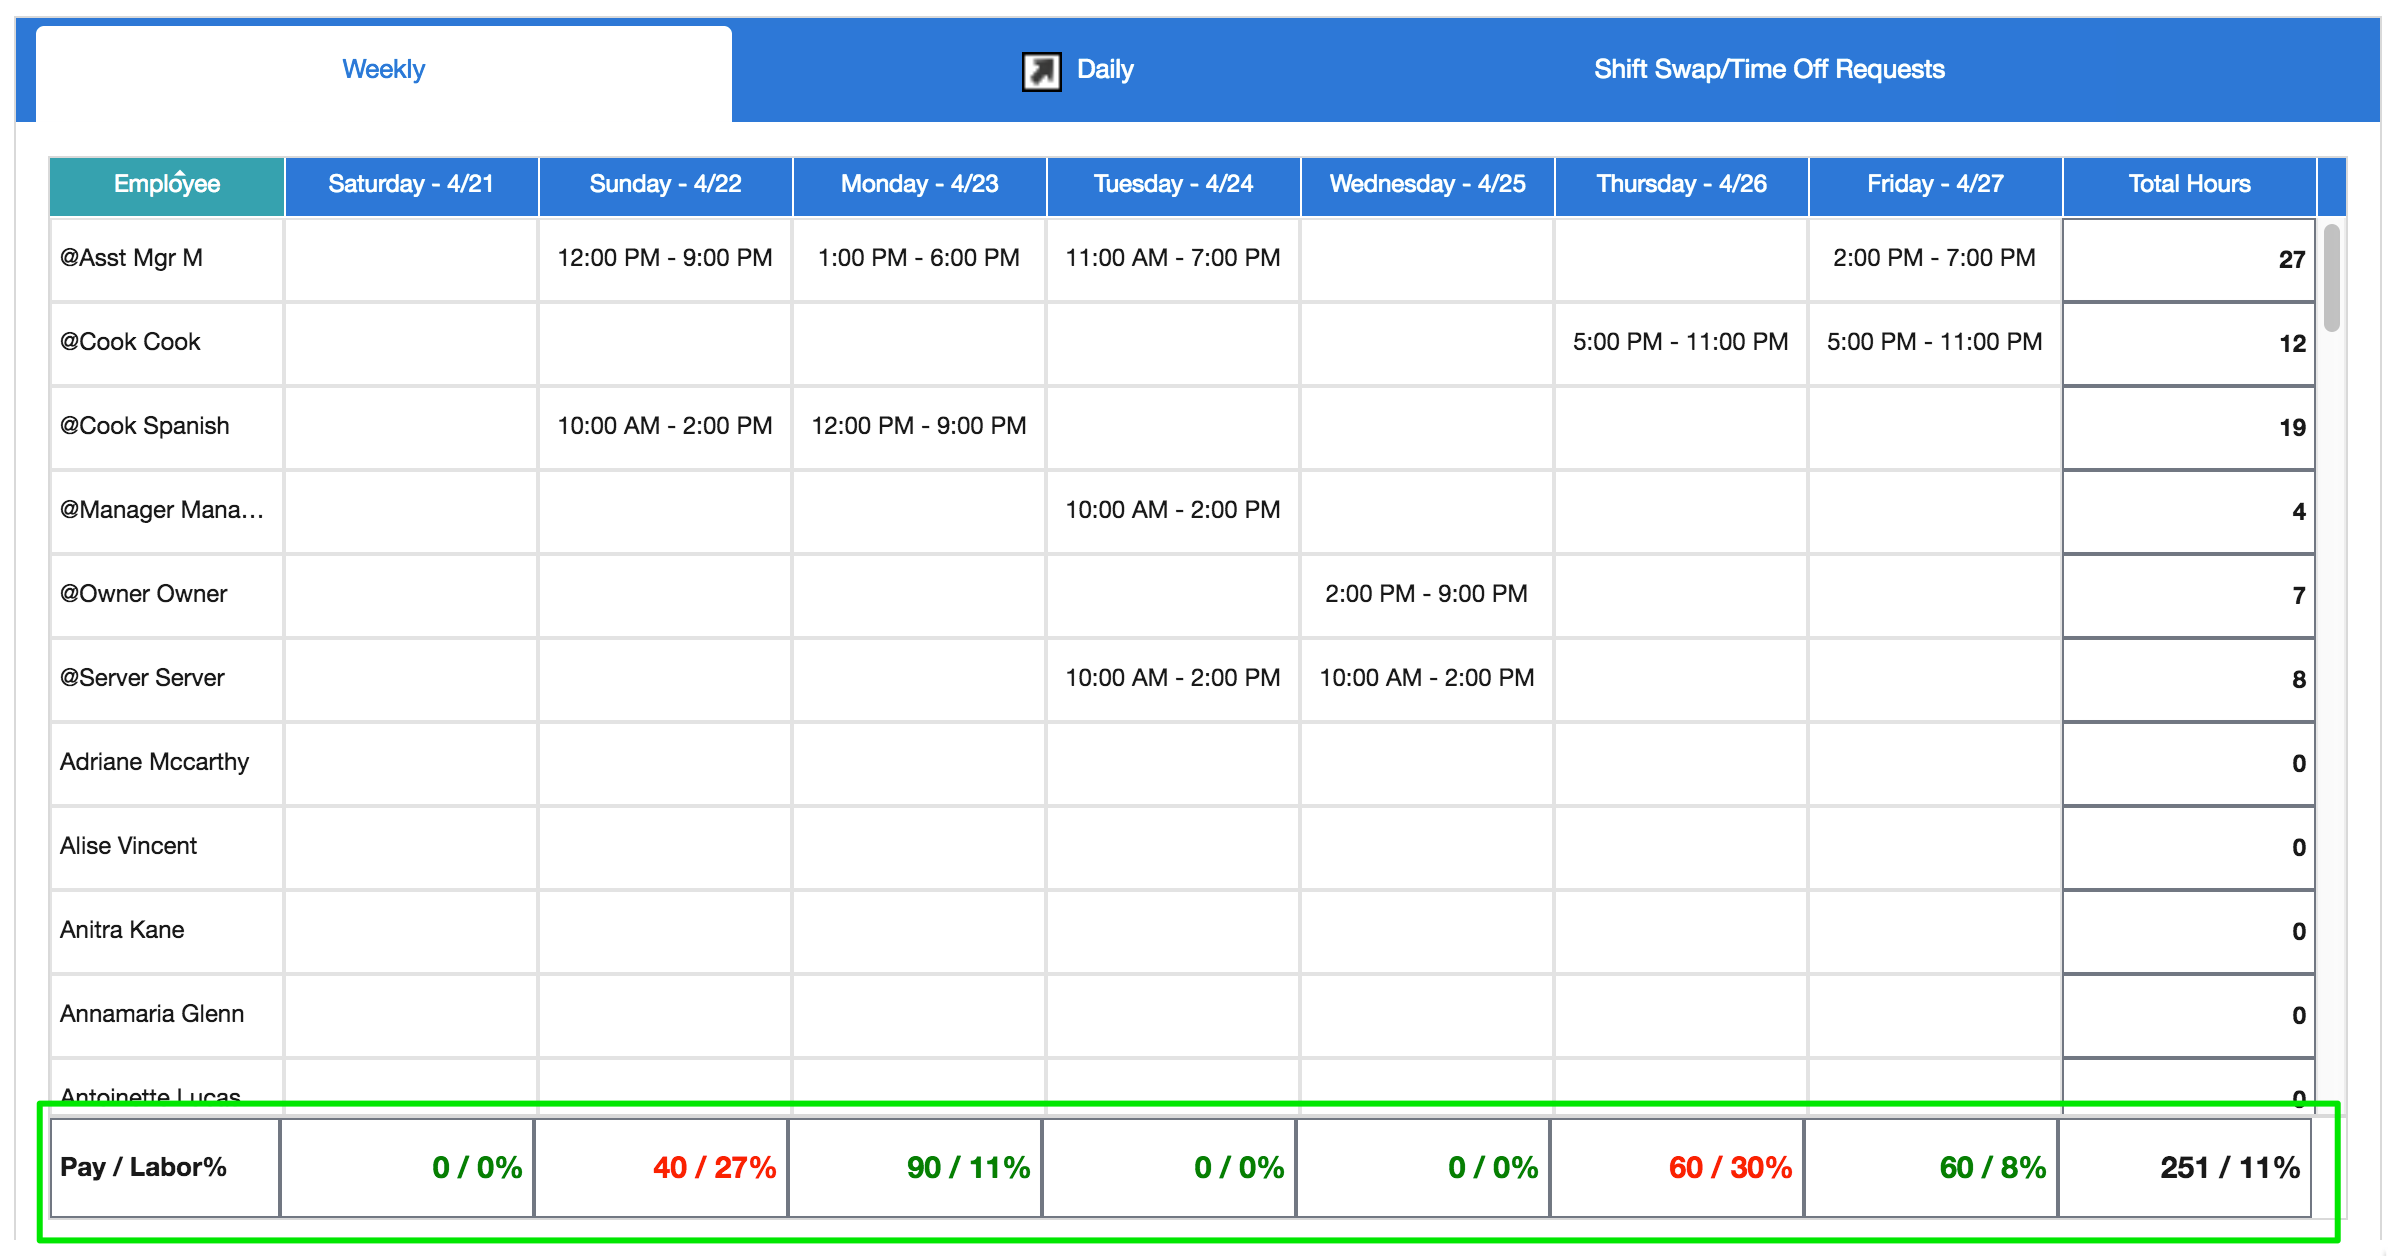
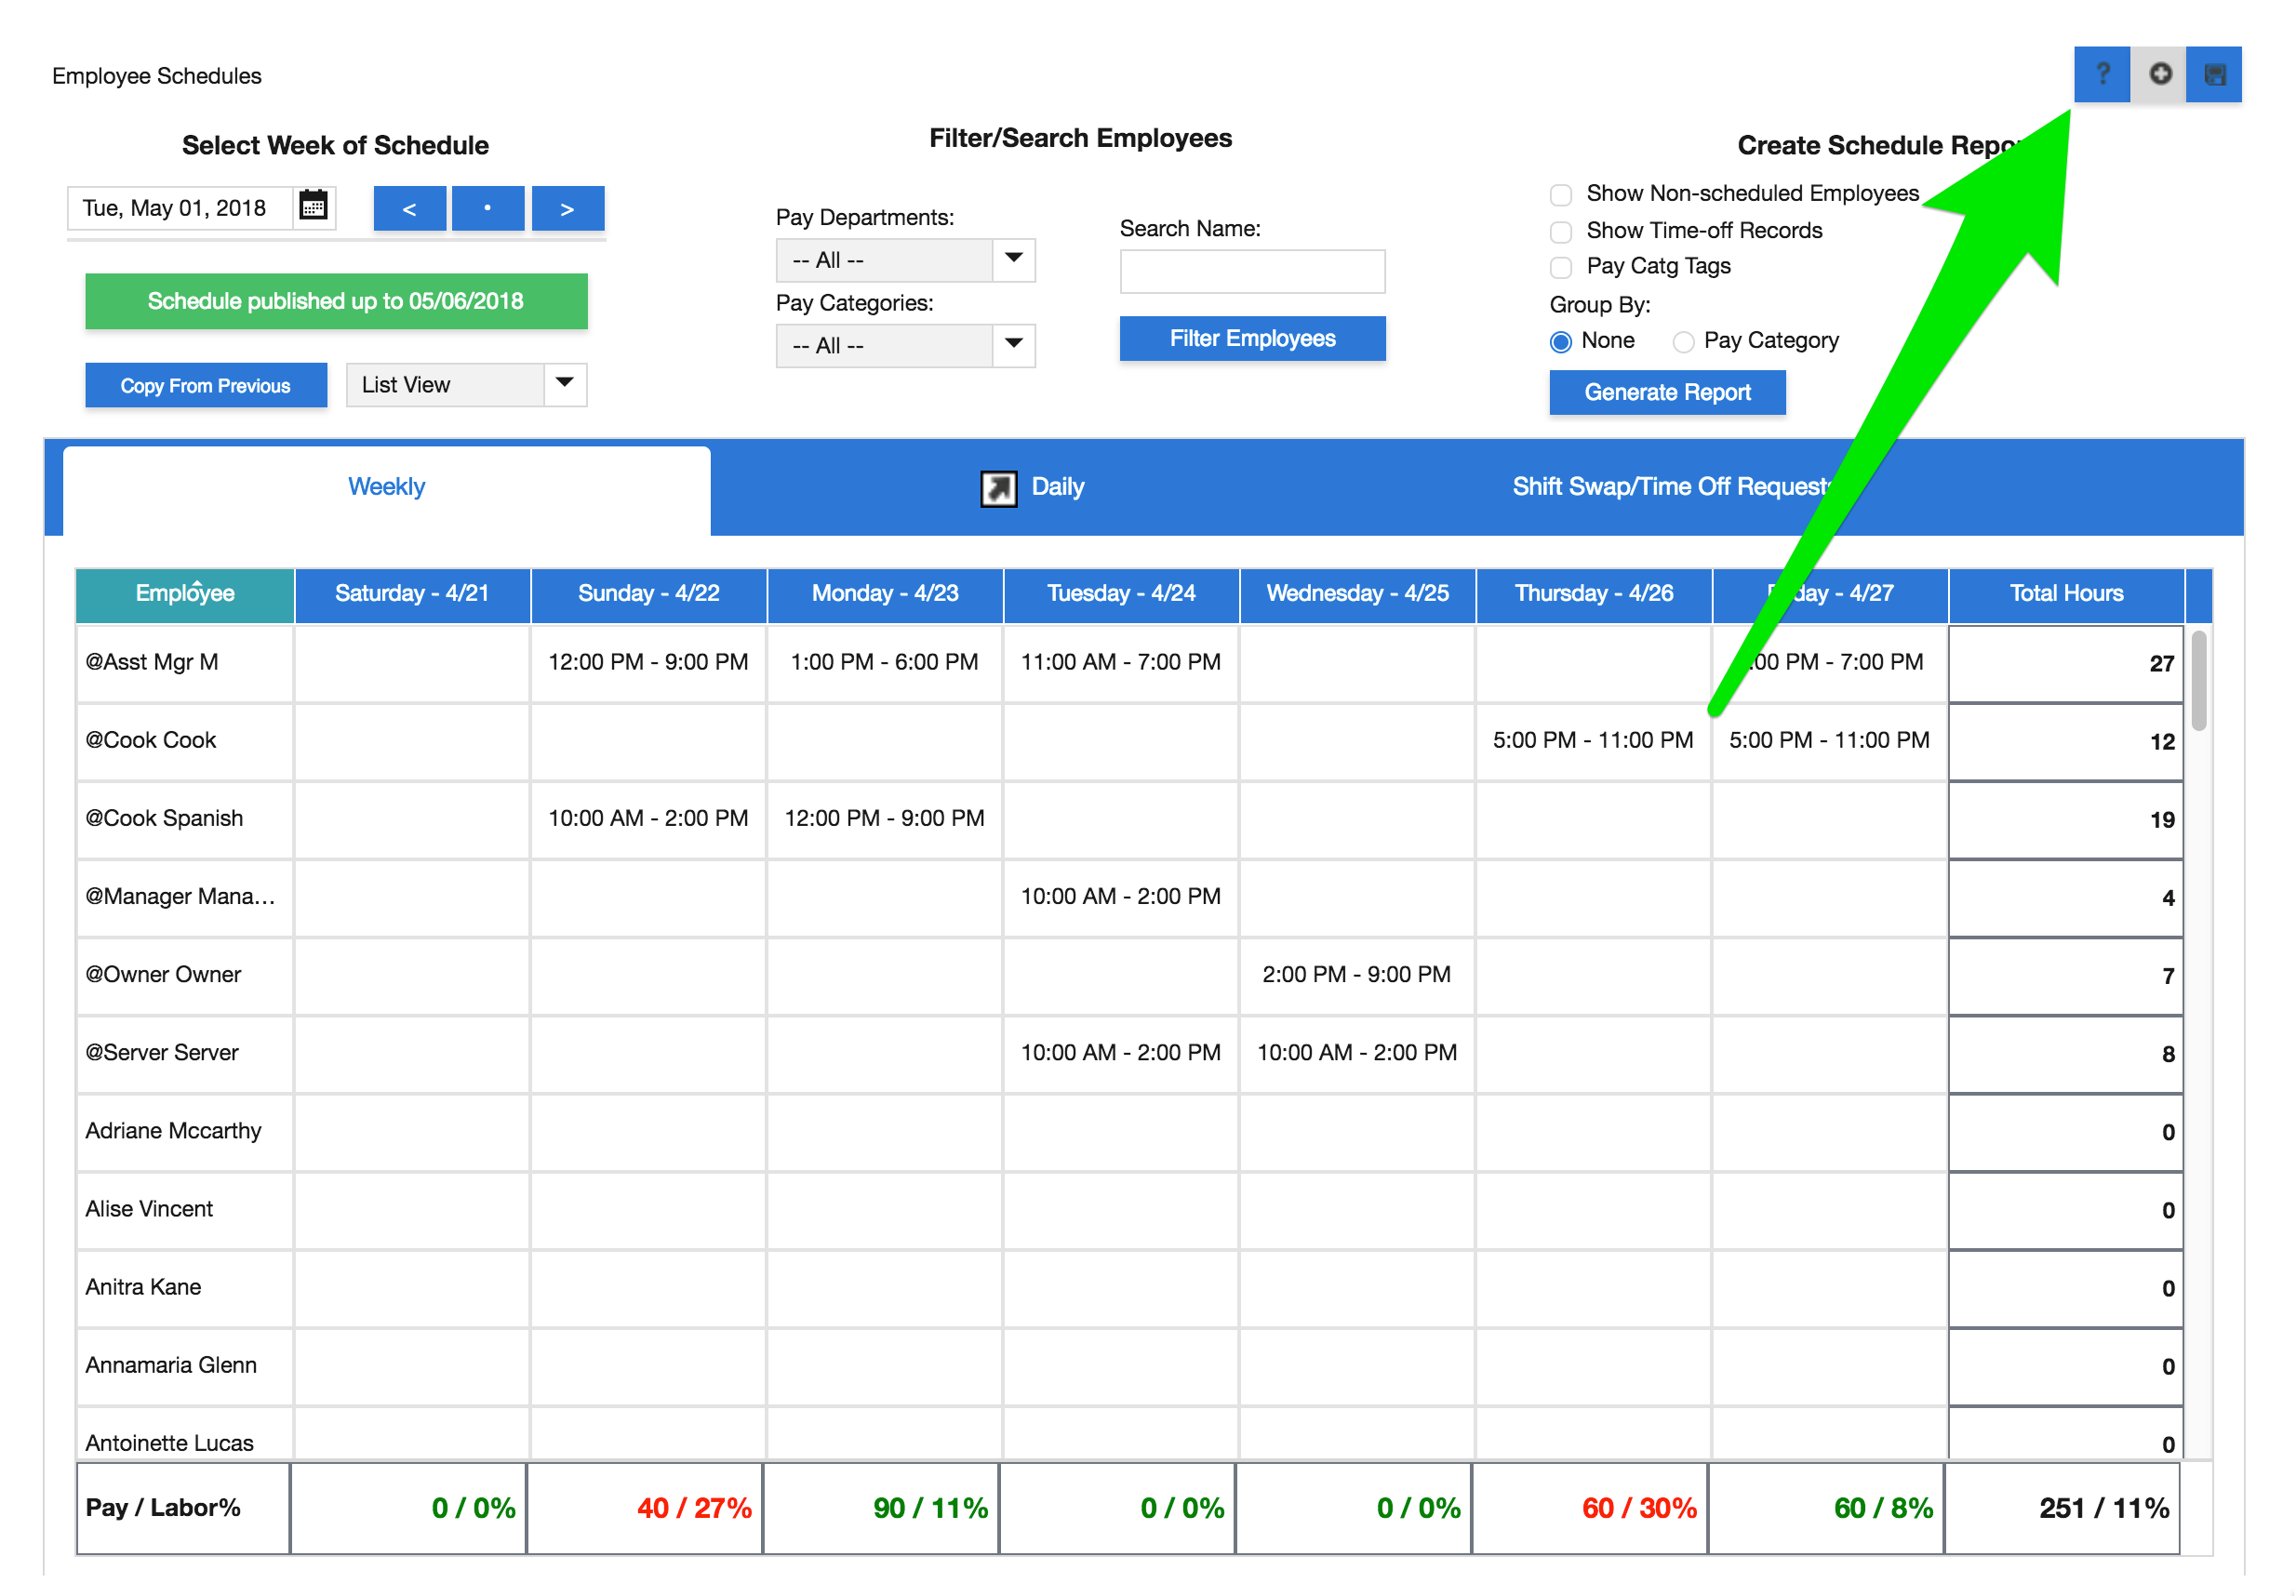
The bottom row of the employee grid is named "Pay / Labor%". Pay refers to how much is spent on employee salaries per day. The labor% refers to the ratio of money spent on labor versus projected sales.
The values in the bottom row will be color coded red, green, or black. Red indicates that labor wages exceed the target sales to labor ratio. Green means labor wages are below the target sales to labor ratio. Black is the default color when no projected sales or labor ratio have been entered.
The rightmost cell of the bottom row shows total amount of money spent on employee wages for the week and the average labor to projected sales ratio for the week.
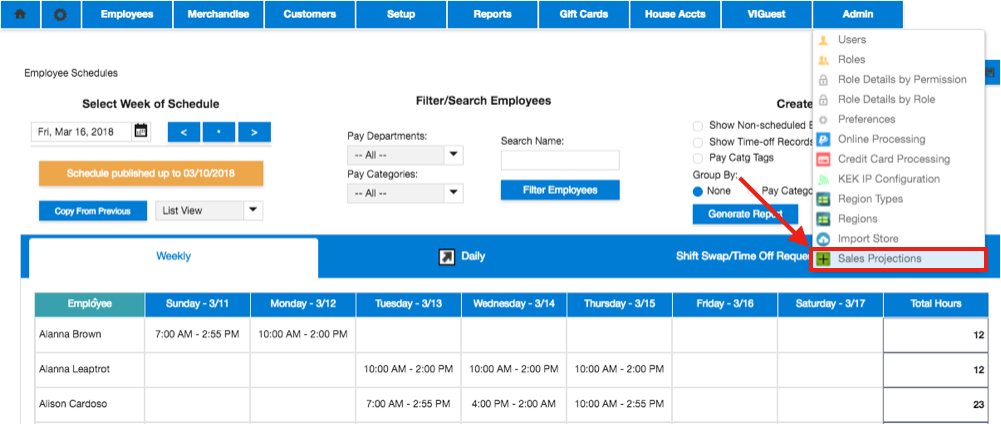
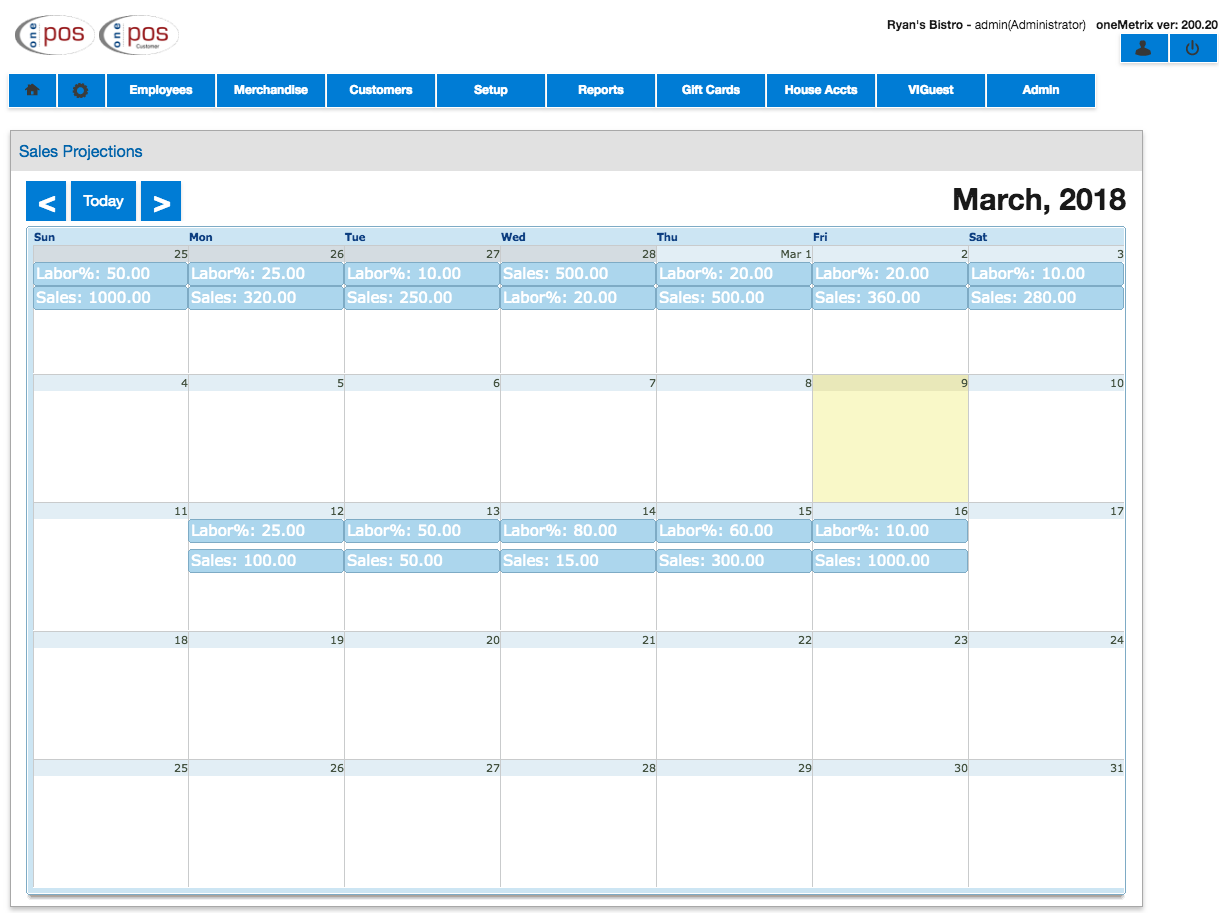
To input the projected sales to labor ratio, go to Admin -> Sales Projections
Here we see the Sales Projections panel. In the upper left corner are navigation controls that lets you move forward and backward in time or return to the current day. Todays date is marked with a yellow rectangle.
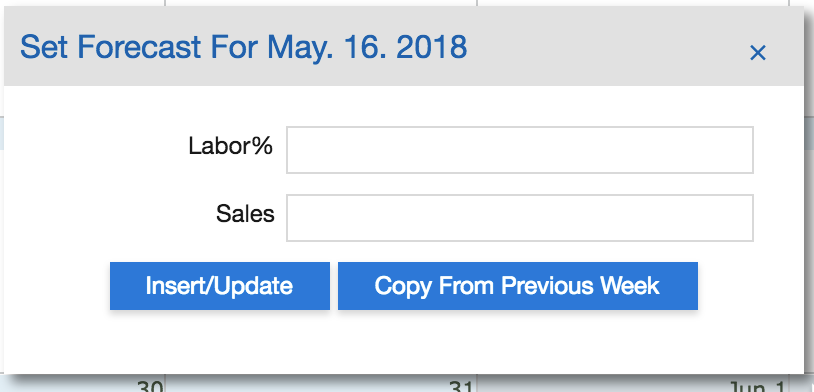
If you click on a date, a small window will popup and let you enter sales projections and target labor to sales ratio for the selected day. Click "Set/Update" to insert or update values.
You can also copy all the entered values from one week to another by clicking "Copy from previous week".
Training Videos
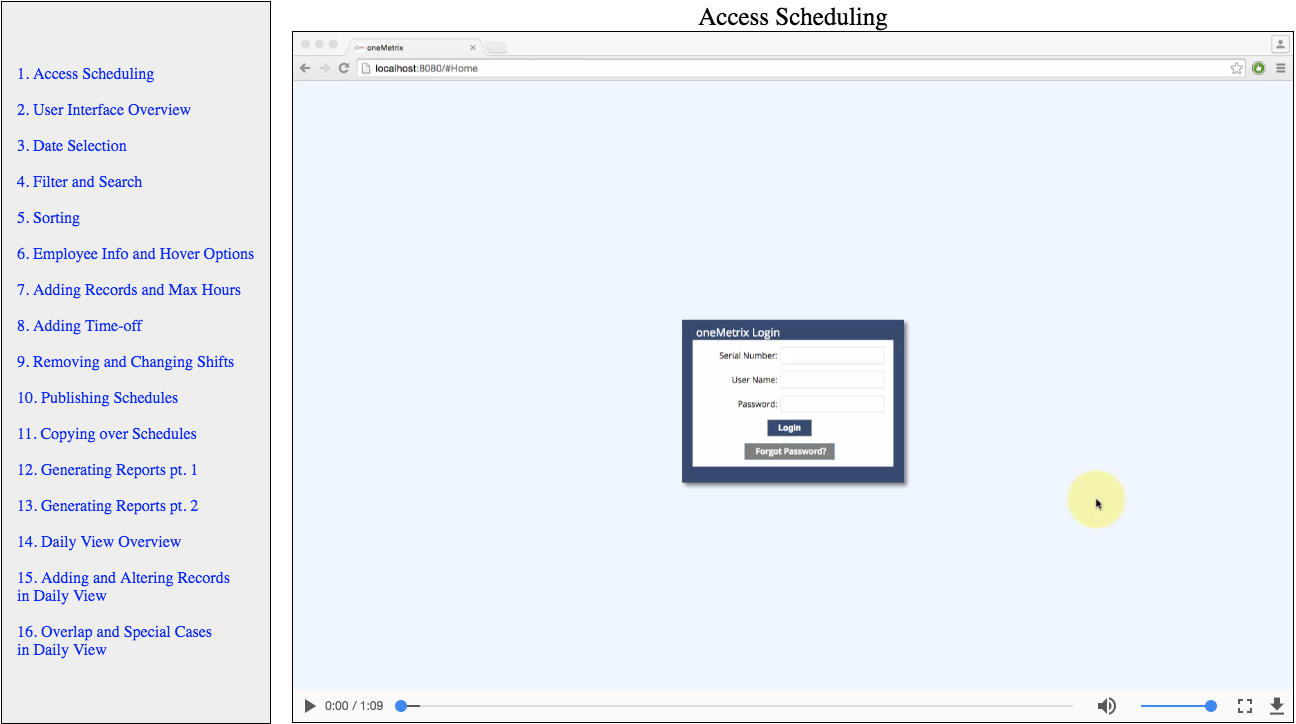
Training videos demonstrating these tasks are available via onemetrix.com. Click the “?” button
to access these videos. Make sure your browser is not blocking the popup window showing training videos.
Available training videos for oneSchedule in oneMetrix.
Related Articles
oneSchedule for Employees
oneSchedule is an app for iPhone and Android app that allows employees and managers to manage their schedule. Suggest Edits Specifically it allows employees to: view their upcoming schedule transfer their shift to another employee request time off ...oneSchedule for Managers
oneSchedule is an iPhone app that allows employees and managers to manage their schedule. Suggest Edits For managers, oneSchedule provides the following functionality: view employee shifts approve or decline shift transfers between employees approve ...Unknown Exception Error In Onemetrix / Oneschedule
When entering employee schedules in onemetrix, there is an error that can appear when a date is selected to add an employee shift to. This will occur if an employee does not have a pay category assigned Verify Pay Category - Still in Onemetrix, ...how do to create logins for team members for the OneSchedule app?
Your team members can get a schedule token from the POS system, this is what they will use to sign into oneSchedule. They can get their token by signing into a terminal - going to "Employee Menu" - and then selecting "Request Schedule Token" in the ...WTI Overview
WTI (Worldwide Telecommunication Inc.) Routers are the routers we use to create a dedicated network for our product to work efficiently from. They are typically set after the customer's router, the communication route being Modem -> Router -> WTI ...