Using Prepay with onePOS
Pre-Pay allows for a location to open a tab and keep a customers card essentially 'on file'. The system will authorize the card for the amount set by the location at first, then charge the full amount when the tab is closed with the pre-pay option.
Manager Console Set Up
Payments
- Open onePOS Manager Console
- Go to Setup > Payments Setup > Payments
- Select the CreditCard Payment Type on the Left. It will turn blue when selected.
- Select Edit
- Enter the Pre-Auth Amount

This is the amount that the card will be authorized for.
Put simply, the POS will check to see if the card can clear at least this amount and will approve if it can.
- Enter the Pre-Auth Tip if preferred
This is only basically just increasing the amount of the pre-auth, so it is not really neccesary. It is typically left blank.
- Click Ok when finished.
Incremental Authorization
If you want to add incremental authorization, select ‘auth' in the Edit Payments window.

note: you will need a tier 2 technician to set this up or make changes
- Incremental authorization works by authorizing the card every time the tab goes up by the set amount. The system does this automatically.
- For example, if you enter in ‘10’ – the card will be authorized again every time the tab goes up by 10 dollars.
- This ensures the card has enough to cover the increasing tab amount. The set incremental auth amount is based on location preference, though you will typically see these set anywhere from 10-$0
 IMPORTANT: Incremental Authorization can help
prevent situations where a card is approved for the pre-auth amount, but
declines when closing the pre-pay.Incremental Auth is a good combat to charge backs. Incremental Auth will
get a second authorization if the tip amount or prepaid close amount is
over a set percentage than the original authorized amount.
IMPORTANT: Incremental Authorization can help
prevent situations where a card is approved for the pre-auth amount, but
declines when closing the pre-pay.Incremental Auth is a good combat to charge backs. Incremental Auth will
get a second authorization if the tip amount or prepaid close amount is
over a set percentage than the original authorized amount.Dining Areas
In order for the pre-pay buttons to be accessible, the ticket must be opened in a dining area that allows Pre-Pay.
- To access the Dining Areas settings, select Setup>Revenue Source Setup>Dining Areas
- Select the dining area you would like to edit on the left (it will be highlighted blue), and click Edit
- From inside the dining area, select Lookup
- From the Lookup Screen, Type in "Pre"
- Double click on the lines where you like to select the prepay available options for that dining area.
- Do this For 'Allow Pre Payment' ONLY

Here you can also select whether a receipt is printed upon first using card for pre-payment with the 'print pre payment voucher' checkbox. See more in '(optional) not printing voucher' section.
- After you have selected the appropriate settings with an "X", click OK.
- Click OK from within the Edit Dining Area Screen.
- Click Done from within the Dining Area Select Screen. This will ensure changes have saved
- When changes are done, be sure to hit Reload Now on the terminal manager menu.
(Optional) Not Printing Voucher
You can select whether a receipt is printed upon first using card for pre-payment with the 'print pre payment voucher' checkbox.
- To NOT Print a voucher, Repeat the steps from the "Dining Areas" section of this article, and make sure the print pre payment voucher box is checked.
- Back in dining area setup, go to the Payments tab
- In the box for 'Pre-Pay Count' make sure it is set to 0.
'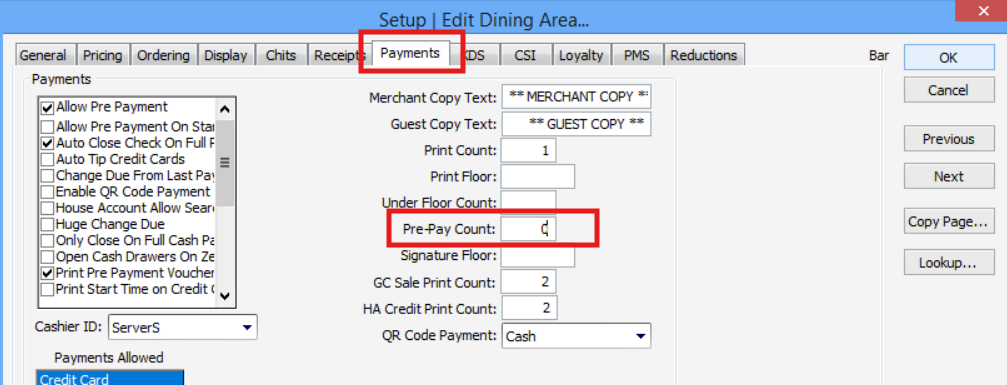
- Click OK when finished. Now nothing will print out when pre-pay is used.
Starting a Tab with Prepay on FOH
- From the Close Check Screen, Select Pre-Pay.
- Note that the lighter blue means the option has not yet been selected, you will notice the button color change and the menu options reduce when you select this option.
- You will notice there is now only one available payment type. Select CreditCard.
- A box will pop up and go through a few text options before requesting the card to be presented.
If you insert the chip into the card reader, it will automatically assign cardholder name to the tab. Note that tap or swipe will not do this.
- After you have inserted a card and the transaction processes, a preauthorization slip will print requesting a signature for the amount that was pre authorized unless you configured otherwise.
Closing a Tab Using Pre-Pay
After the Pre-Pay has been Authorized, when you go to the close check screen, you will not see any payment options, but you will see the Use Pre-Pay option.
- Selecting this option will produce this menu
- If you would like to use the same payment method, select OK.
- If you would like to use a different form of payment, select Remove Pre-Auth so that the other payment methods become accessible again.
Related Articles
Understanding Checkouts
Overview Checkouts are completed when a FOH employee is done taking orders for the shift or day. Checkouts are the summary of an employee's transactions from their first until checkout. Checkouts reconcile transactions, sales, and tenders to make ...New Tablet Configuration (onePOS Android App)
Tablet Startup (First Launch out of the box) - When you remove the Tablet from the box, Press the button on the lower right side of the Tablet to power the device on. - Once the device is on, unlock the screen by swiping up or entering the PIN 1234 ...oneConnect by onePOS
Explore oneConnect2 by onePOS: Your Restaurant Management Tool Discover the power of oneConnect2 by onePOS, your ultimate tool for remotely monitoring live and past-day sales and restaurant information. Whether you're managing one location or ...Gratuities in onePOS
Overview Gratuities are tips that are added to a customer's check for various reasons a restaurant may deem appropriate. An example of this would be restaurants adding a 20% gratuity to every check from a large party of 10 or more. There are preset ...Unable To Select Pay Category On Clock-In
If an employee works multiple positions and therefore has multiple pay categories applied to them - normally they are able to select pay category upon clocking in. If a location is using OneMetrix scheduling, however, this can disallow the employee ...